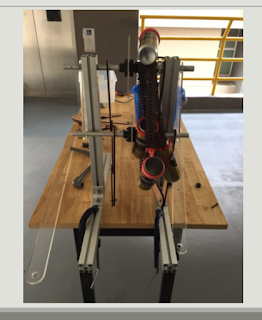
Chain Pump
Navindran S/O Chandran/ Navindran Chandran
Diploma in Mechnical Engineering @Singapore Polytechnic
Works as Fablab Assistant @ Fablab @Singapore Polytechinc
Diploma in Mechnical Engineering @Singapore Polytechnic
Works as Fablab Assistant @ Fablab @Singapore Polytechinc
This is my module project and I don't know what grade I get. The module called Engineering Invention from Engineering Academy. Basically this project is about Ancient Invention the theme I get is South- East Asia Ancient Invention. I had a group of consist of 3 DEEE( Dip.Electrical & Electronic Engineering) student and 2 DME(Dip.Mechanical Engineering) student. So we were told select 3 Asian Ancient Invention. So we select Water-clock , Chain pump and Water - Hammer. Then my lecturer in- charge ask us to do Chain pump..
So what I had in my mind was last time I did a project where I have a rusty attachment chain that I buy to make a threaded wheel. So I use that. So we had 2 prototype presentation
So this will be the first one;
From the left; The overall prototype, electronic component , and the support system..
So what I had in my mind was last time I did a project where I have a rusty attachment chain that I buy to make a threaded wheel. So I use that. So we had 2 prototype presentation
So this will be the first one;
From the left; The overall prototype, electronic component , and the support system..
Challenges:
Problem that we face was the attachment chain and the sprocket doesn't fit as we were using Bicycle sprocket and K-35 attachment chains.
Our prototype was a kind of big and take to much space
No Mobility. Cannot move around with that.
Improvement that targeted to do:
Use only one stand and make it retractable
Decrease the chain size by half
Find a suitable Sprocket.
Do a stopper that we can only rotate it in one direction.
Second and Final Prototype:
The Second prototype was a success but there was no good finishing as the rusting of the chain becoming worse but the prototype works.
What I did??
I use a 8mm acrylic as a working support where we attached the acrylic to connect the driven and effort shaft together firmly and it's works.
Not only that I found the file for K-35 sprocket online:
I just laser cut using acrylic .
I tried to 2d router using aluminium but it doesn't turn out well. So we stick with acrylic.
Breaking the chain is the hardest thing that I do in this project .
But I manage too break it.
Below will be the CAD drawing report that maybe will give you the understanding.
For more brief pictures I will send put the pdf file.
Materials that I use for this project:
- Aluminium Extrusion 40 x 40 L500mm&L400mm(Support system)
- Acrylic 3mm 8mm( For sprocket, hooks, one way gear mechanism, box for electronic parts and the working support)
- Steel pipe D6mm L200mm
- PVC pipe D10mm L500mm ( we use it for the lever with 90degree connector)
- M4 screw multiple lengths
- Wood for the retractable usages
- K35 attachment chain.
- Tin cans
- ABS for 3d printing purpose
- LCD screen
- Ultrasound sensor 2
- Bluetooth receiver..
- Adjusting switch
- Arduino kit
- Connecting Wire.
Fabrication Techniques
- 3D- printing
- Laser cutter
- 2D- router
- Vertical Miling
Target that I achieve:
Make it portable (ACHIEVED)
Make it smaller then first project(ACHIEVED)
Make a stopper ( ACHIEVED)
Find a suitable sprocket(ACHIEVED
Video:


No comments:
Post a Comment